Request Message Editor |
When a service and its operation is selected, now it’s time to edit the request message according to the objectives of the test.
To start efficiently, let’s start by getting familiar with the request message editor.

 : With this button, you can choose the service to test.
Service: This label recalls your current service under test
Endpoint: In this text-box you can specify the endpoint of the service. You may use variables in the endpoint value. Endpoint value will be changed if Test Environment is changed.
 : This button resets the endpoint to its default value. If the default value contains variables, they will be valorized by the values from current selected test environment
Environment: Select the current test environment, changing test environment will change the endpoint of the service, and credentials
Options: Additional options applied when sending the request message. Refers here to know more about Options.
History: Historical request messages
Request message can be edited in two ways:
Using Intelligent Object-Model based editor
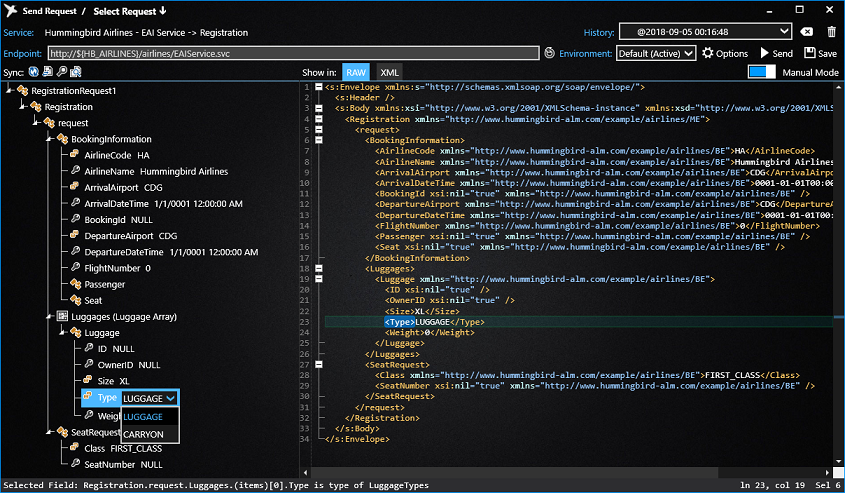
The Object-Model request editor is based on the service description, you don’t need to initialize the structure yourself by reading and reviewing the service definition. The editor did it:
Object initializing: initialize an object in the request message
Type recognition: Message editor recognizes the type of objects and values and checks if the input is correct.
Active tracing: when select a node in the Object-Model, the related tag will be highlighted *
Sub Type recognition: when initializing abstract objects, the editor finds also all suitable sub types.
Refers here to know more about the Object-Model Request Editor
* This function works actually on XML based request messages (SOAP, XML over HTTP, …) or in the XML view for a Non-XML request.
Using text editor
As a Geek, you can also edit request message using the test editor. The built-in text editor checks in real-time errors of structure, value and data integrity for you in real time.
As shown by the following example: when we made mistakes:
An error message is shown in the status bar, click on it can set the cursor to the error tag.
The error tag is highlighted
A Red-Dot is shown on the progress bar to show the relative position of the error to the document. Click on the Red Dot can also bring the error tag into view.