Manual Testing |
Testing is a key step in the software development process to ensure the behavior of the software is correct in prior to release software to end users. While the software may be complex and composed with several components which communicates to each other. So we need tests to ensure Each component works as expected and they Communicate correctly with each other.
Each component will be invoked by either the user with user interface, or another piece of software. In the same time, it may invoke other components or software: These components provide data or result that your application do not have, your application needs the result to continue its process.
Of course, These components may be developed by another team or even another organization, often not available or stable during the component test phrase. Thats why Hummingbird provides the way to simulate the caller of your application, and also the way to simulate other components that your application depends on: it receives data from your application, and provide result as you defined to meet test objective.
The first functionality is often called Driver or Injector, and the second functionality is called Stub or Service Simulation.
In this section we will discuss how to test your application with the Driver, and how to simulate service you depends on with Service Simulation.
With test runner, hummingbird can be used both as Driver and Stub:
Driver: replaces a component that takes care of the control and/or the calling of a component or system. That means you can call a web service under test with hummingbird.
Stub, also called Service Simulation or Service Virtualization , is used to simulate the component or system of which your application calls.
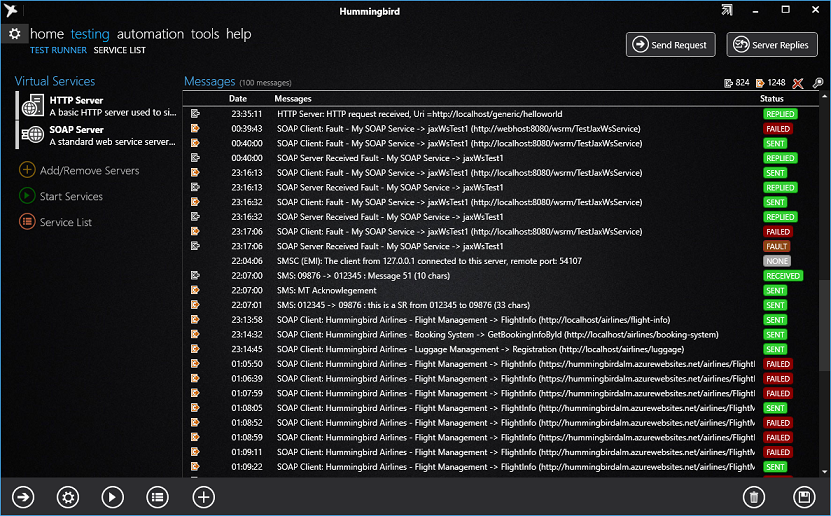
In hummingbird, that are combined in the same user interface. To start manual testing, go to the Tab Testing -> Test Runner.
As shown by the image below:

On the left side, the software listed all Virtual Services you want to use. For example: The SOAP Server is used to simulate all SOAP Web Services, described by a WSDL document. And the HTTP Server is used to simulate all low level HTTP requests or the REST web services.
If you need other virtual services, click on link Add/Remove Servers to show and activate available virtual servers installed. When a virtual server is available, it doesn’t mean the server is running.
You can click on the link Start services to start simulation for the services of all virtual servers, or start and stop individual virtual server. When a virtual server is running, a green border will be shown on its left side.
Another part of the screen is Messages, it records every incoming and outgoing transactions. Incoming message means virtual server has received a request from your application and replied as configured. Outgoing message means you are using hummingbird to call the web services exposed by your application. You can understand the direction by the icon.
 This icon indicates an outgoing
message
 This icon indicates an incoming
message.
 This icon indicates the call is
performed with an authentication process, such as Basic Authentication that
uses a Username/Password pair, or a Windows Integrated Authentication.
 This icon indicates the call is
performed with a secured transport level, such as HTTPS
The message has a status, shown in different colors, indicates a Technical result. Commonly, if the server send the reply with HTTP 5xx or HTTP 4xx status code, the request is considered as Failed. Other technical issues such as Timeout, Firewall, and Connection issue, the status will also be tagged as Failed. To understand the status and its meaning, please refers to [TODO: Link to Hummingbird.TestFramework.Messaging.MessageStatus]
Finally, you have two button, gives you access to the two main functionality
Send Request: Allows to test services: All services is organized here.
Server Replies: Allows to configure the service simulation behavior.